The majority of dentists are working digital these days. Per research we commissioned from Isurus Research, a third-party firm, 75% of US dentists will practice digital dentistry this year.
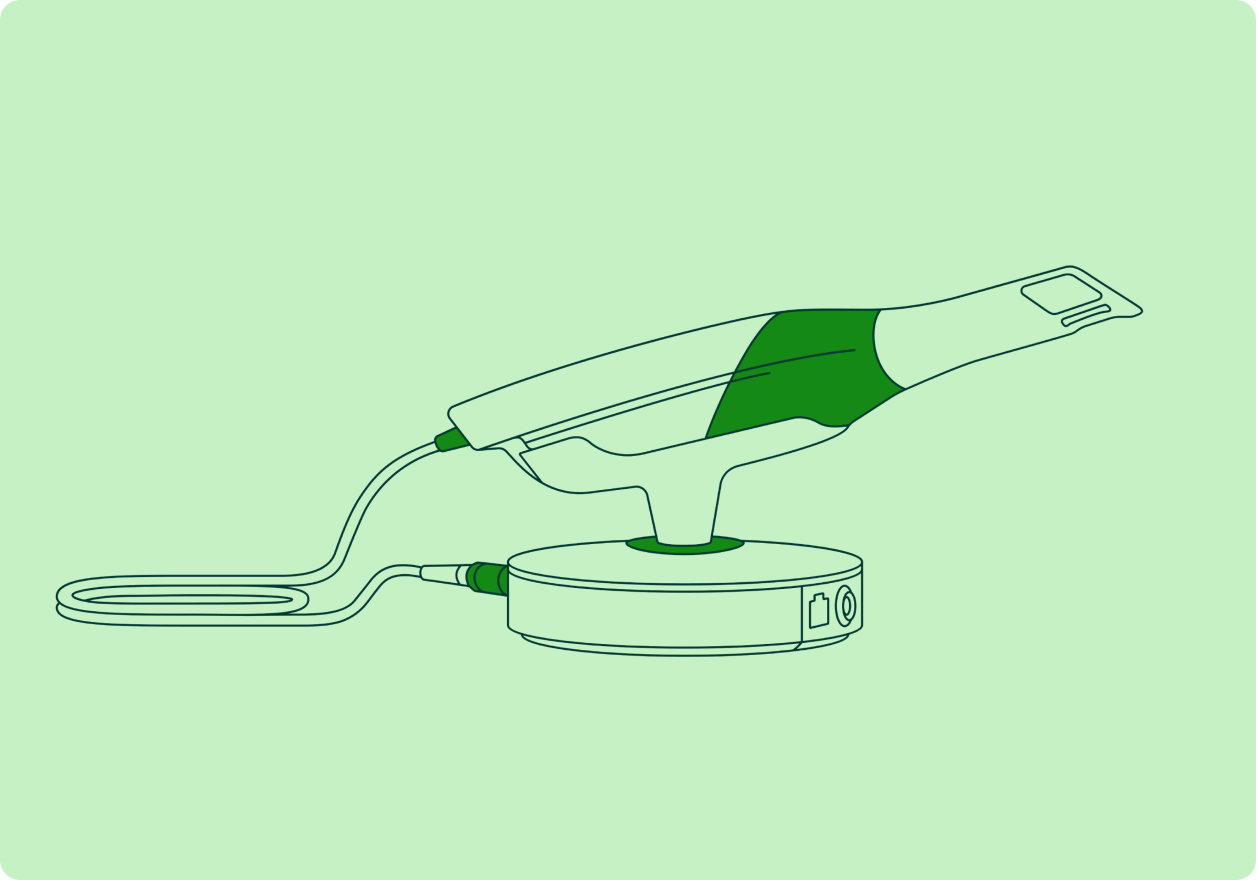
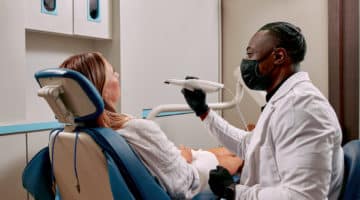
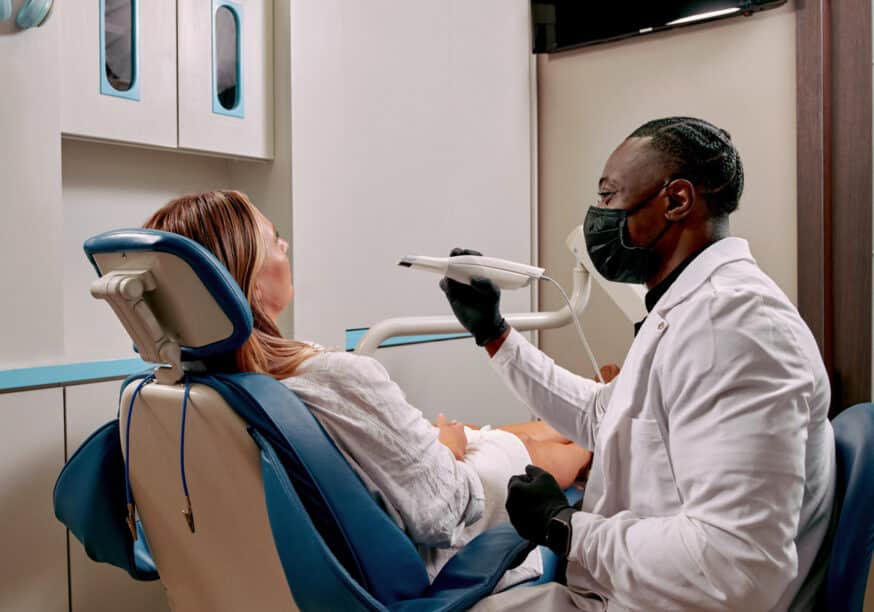
The starting point of a digital workflow is capturing the patient’s dentition with the intraoral scanner (IOS), a remarkable technology. The small camera takes intraoral photos in a half-inch by half-inch field, delivering a high level of precision while managing the humid and wet oral environment where soft tissues move and change shape constantly.
Today’s scanners have improved technology from the first ones to hit the market. Features exist like Smart Filtering that recognizes the difference between hard dentition elements, teeth, and soft tissue in dental pictures, removing unnecessary tissue from the scan data based on movement.
However, none of the available software features do you any good without proper dental photography techniques. Also, nuances exist regarding setup in the operatory and sensor handling during image capture. Plus, it is critical to isolate soft tissue properly to keep the area clear from contaminants that would interfere in data capture.
The ability to capture adequate intraoral photos requires some training and attention to detail. We look at IOS scanning techniques and share tips and tricks to leverage this advanced digital dental technology to improve the quality of your dental photography.
Preparing to scan
Your IOS technique fundamentals start with how you prepare to take scans. For example, the operatory layout is essential. The room should accommodate the scanner cart and computer and allow for a setup angle enabling you to see both the patient and the live HD images on the scan box. If the scan box is behind you, you will have to turn around to see the scan, which interferes with ergonomics and efficiency.
Also, prepare to do a full arch scan for every case, especially for complex restorations, because the more information you give the lab, the better. Full arch scans allow the lab to provide greater bite accuracy by having information on how all the teeth come together. A four-to-six-tooth quadrant scan doesn’t let the lab know what’s happening on the other side. Plus, the whole arch data gives you a complete digital patient record.
There are a couple more essential considerations for preparing to scan, including lighting, and moisture control. Let’s take a closer look at each.
Lighting
Great scans, like any great photography, require excellent lighting. Therefore, turning off any external light sources, like loupe lights and overhead chair lights, is essential. The scanner has an internal light that will be best for capturing the dental pictures needed for the scan. Any excess light can interfere with this process, creating a glare on the intraoral photos that makes images unclear.
Moisture control
It is also crucial to control moisture before attempting to capture dental photography. Moisture also creates glare and distortions in the scan. Use the air-water syringe and suction before and during the scan to dry the teeth and gums.
Holding the scanner and scanning techniques
Holding the scanner
How you grip the sensor matters, too. When scanning an upper and lower arch, you don’t want to change how you hold the sensor too much. So, after removing the scanner’s protective tip and replacing it with the mirror tip, we recommend holding the sensor like a pencil, letting it rest in the pocket of your thumb and index finger, with the power button accessible easily on the top. Then, you can switch the mirror tip to facing up or down from this position, depending upon which arch you are scanning.
The Twist Technique
To capture interproximal areas and contact points around your prep, try incorporating an alternative scanning approach called the Twist Technique.
Capturing interproximal areas:
- Place the scan on the occlusal surface of the prep.
- Roll the scanner over to either the buccal or lingual sides.
- Position the scanner at a 45-degree angle.
- Twist the scanner back and forth to fill in missing areas around the prep; it is crucial to twist and hold, pause, then twist and hold in the other direction, pause.
- Ensure the light hits the hard-to-reach areas; if the light touches it, the camera is, too.
Capturing contact points:
- Place the scanner on the occlusal surface.
- Rotate the scanner out 90 degrees.
- Twist the scanner back and forth to fill in missing areas around the prep; again, it is crucial to twist and hold, pause, then twist and hold in the other direction, pause.
- Ensure the light hits the hard-to-reach areas.
Tips for intraoral scanning
Following are a few dental photography techniques to help you capture the intraoral photos you need for successful patient outcomes:
- Tip 1: Use anchors and landmarks. In soft tissue scans, where there is not natural landmark, applying biocompatible materials as reference points that can “fast set” on tissue walls allows the scanner to distinguish between soft tissue zones in dental pictures, particularly the cheek and gums.
- Tip 2: Do the math. Integrating math and software facilitates practical rough approximations of what you scanned. Repeatedly measuring and scanning makes the software more tolerant of shiny pink surfaces.
- Tip 3: Employ wax rims. When scanning a fully edentulous patient, remember the scan is a preliminary impression used to make the wax rims. Once fabricated, take a functional wash impression inside those wax frames. That final impression will provide the necessary information to create a master cast and, ultimately, the finished dentures.
- Tip 3: Keep the tissue dry. The best intraoral scans follow the mantra, “drier is better.” Be sure to isolate appropriately, which is easier said than done. However, pay attention to the method you use to control moisture, as some can interfere with data capture. For example, using cotton rolls in the buccal vestibule will not leave enough space for a proper scan. Additionally, consider sponges instead of fibrous material; the fiber shows up in a scan.
- Tip 4: Slow and steady wins the race. Make the movement slow and steady when using the IOS, and remember your scan patterns to ensure you capture all the data necessary.
- Tip 5: Study gum tissue scanning techniques. Capturing the necessary data from gum tissues is enhanced by using a few tweaks in your approach. For example, tilt the scanner on both sides of the patient’s arch. Also, try different angles over the occlusal surface rather than hovering directly over it. In addition, slow down while scanning the posterior teeth; scanning too quickly creates voids.
- Tip 6: Remember tooth preparation matters. Your preparation significantly affects the quality of your scans, particularly regarding margins. Try a Shoulder Prep for a clean margin finish and a robust platform underneath a crown or bridge to minimize margin issues. Chamfer and Shoulder Bevel are also acceptable, but Knife and Feather Edge are not due to a lack of clear margins. Also, double cord retraction is best, but if you have one adequately sized cord, that works, too. Paste and Laser retraction can also work and helps avoid washed margins.
- Tip 7: Learn bite scan techniques. Quality bite scans are essential to producing the best product for your patient. Start by setting the therapeutic bite position to get one, leaving roughly three mm vertical clearance between arches and five mm between the opposing anterior teeth. Use a gauge, gig, or firm makeshift device to ensure a stable jaw position. Remember that the bite scan should cover at least three or four teeth to get the proper alignment and scan the bite on both sides.
Practice makes perfect
Recognize every new technology has a learning curve. The more you practice, the more intuitive it becomes to use the proper technique for dental photography. Plus, investing in time to practice appropriate dental photography techniques now saves time you might have spent recasting later.
In other words, the benefits of investing time and energy in scanning techniques outweigh the challenges of learning something new. Plus, high-resolution scans performed in minutes save time for patients in the chair and you working chairside.
However, not every intraoral scanner is the same. Some manufacturers require various scan path strategies, suggesting a particular direction to operate the wand to acquire better scan visibility.
Also, not all scanners are equal. Some devices involve significant calculations and software usage to achieve scan accuracy. Others are excellent scanners but challenging to use with less sophisticated software. Finding the product with the optimal cross-functional device and software ensures intraoral photos have the best resolution and data.
Practicing your scanning technique improves your transition to digital dentistry. Perfecting your intraoral scans increases your confidence and elevates the patient experience while enhancing the workflows at your dental practice.
Which intraoral scanner is best for you?
Here are the criteria we used to determine which intraoral scanner is the best. We think this criterion is the best way to find the all-around winner, but it might help to weigh these facets against your needs to see what suits you.